OTA update with ESP8266/ESP32
Both ESP8266 and ESP32 Arduino SDKs provided the OTA update feature. The OTAdrive Arduino library provides the same methods for both modules.
To start the process you need to define a product in your OTAdrive panel and copy the APIkey into the following code. you should call the updateFirmwareInfo() method every n minutes. This method calls the OTAdrive and checks if new firmware exists or not, then starts to install new firmware on the module. Be careful, you have some limitations to calling this method depends on your membership level.
#include <otadrive_esp.h>

void setup()
{
  WiFi.begin("YOUR SSID","YOUR PASS");
  ...
  OTADRIVE.setInfo("YOUR_API_KEY", "v@1.1.1");
  ...
}

void ota()
{
  if(OTADRIVE.timeTick(30))
  {
    OTADRIVE.updateFirmwareInfo();
  }
}

void loop()
{
  ota();
}
When update progress starts?
There are two strategies to decide update the device's firmware from the OTAdrive or not.
Version Matching: The legacy method is to check version code matching. In this mechanism, the library starts to update if the version number of the device's firmware is different from the version number of the firmware that is set to the device's group belongs.
MD5 Matching: This mechanism is used by the OTAdrive library as the default strategy from v1.1.10. In this mechanism, The version number is ignored and the library starts to update if the MD5 checksum of the device's firmware is different from the MD5 checksum of the firmware that is set to the device's group belongs. That means if every single byte of the firmware changes, the library detects it and starts to download the firmware from the OTAdrive.
To choose which mechanism to use you can see our library documents.
OTA troubleshoting
The first step to ensure your device is talking to OTAdrive is to check your product's Default device group. Your device should be on the list on the first successful connection with the OTAdrive server. If your device isn't there, you should check the followings:
- Is your device have access to Wi-Fi and the internet?
- Did you place your own API key correctly?
If your device is listed in the device group, you should change the device state to verified. only verified devices can access the firmware or other services.
Enable serial log
To enable serial log monitor, you can do following steps in each IDE.
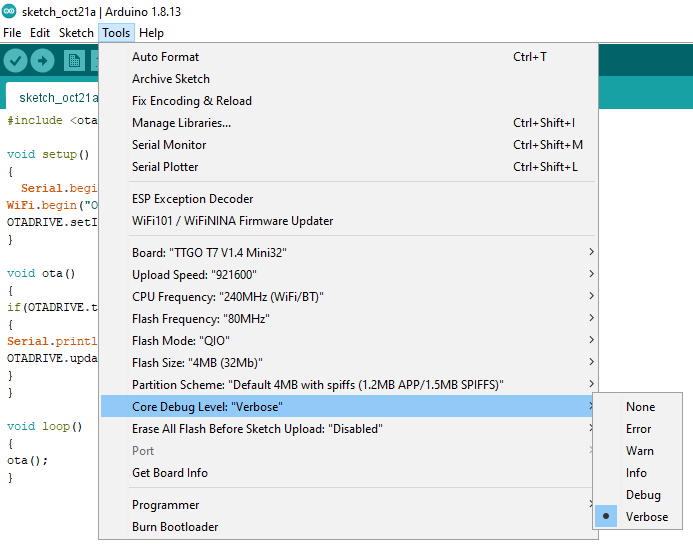
- Enable Serial log monitor in Arduino IDE
Go to
tools/Core Debug Levelmenu and chooseVerboseLevel. Then recompile and program the ESP module. Now you can see the output logs in any serial monitor tools.
- Enable Serial log monitor in PlatformIO IDE
Go to the
platform.inifile and add the following code to the file
; for ESP32
build_flags =
  -D CORE_DEBUG_LEVEL=ARDUHAL_LOG_LEVEL_VERBOSE

; for ESP8266
build_flags =
  -D ARDUHAL_LOG_LEVEL=4
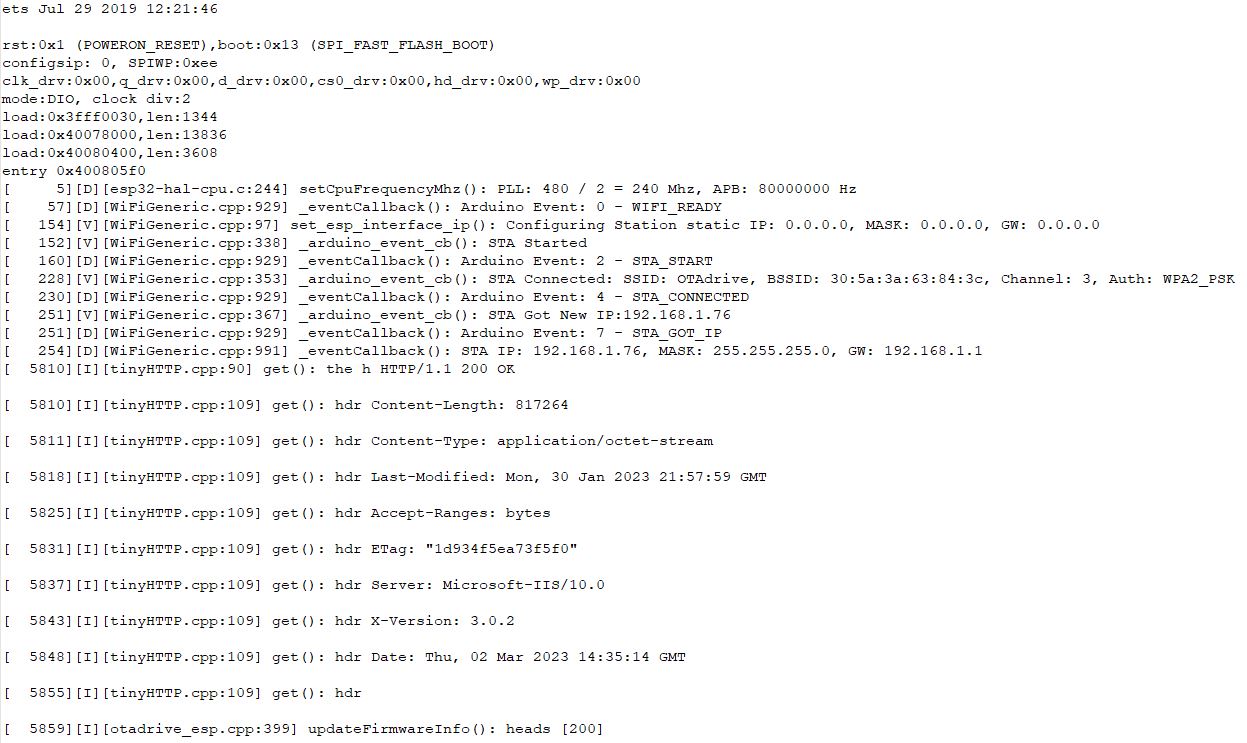
Output log in your serial tool should be something loke this: