OTA Images & HTML Files For ESP32 Webserver
Introduction
Espressif ESP32 and ESP8266 modules are very powerful to develop any type of IoT product such as wireless sensors or actuators as cheaply as possible. It's very useful to implement some HTML pages in your IoT device to let users change the settings of the device or do some operations with a cell phone or desktop computer.
In legacy embedded programming the developer should implement HTML, CSS, JS,... codes in the source code as a string array and send them to the user's web browser. This method has three big problems:
- The developer has to convert HTML, CSS, and JS files to c++ strings, if the file is as big as 40kB for example, the string is very long and the source code becomes nasty.
- The static HTML, CSS, and JS files are stored in the main code flash memory and waste programming space.
- If you want to do any changes to a UI icon or HTML tag, you have to recompile the entire source code, test all of them carefully and reprogram the device and restart it!
Simple HTML Web Server On ESP32
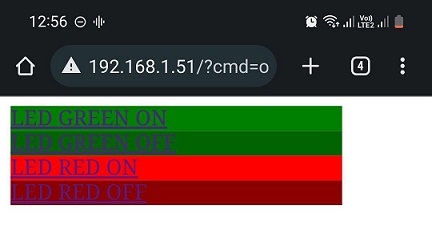
The following code is a simple web server you can implement on ESP32/ESP8266 modules. On this program, the user could turn on/off two LEDs via the browser by clicking on each link.
 {.mud-image .fluid .object-fill .object-center}
#include <otadrive_esp.h>

#include <Arduino.h>
#ifdef ESP32
#include <WiFi.h>
#include <AsyncTCP.h>
#elif defined(ESP8266)
#include <ESP8266WiFi.h>
#include <ESPAsyncTCP.h>
#endif
#include <ESPAsyncWebServer.h>

#define LED_W 4
#define LED_B 16
#define LED_G 17
#define LED_Y 18
#define LED_R 19
#define BTN1 13
#define BTN2 12
const int leds[] = {LED_W, LED_B, LED_G, LED_Y, LED_R};

AsyncWebServer server(80);

const char *ssid = "OTAdrive";
const char *password = "@tadr!ve";
const char *HOME_HTML =
  "<html><body style='width:250px'>"
  "<div style='background-color:GREEN'> <a href='/?cmd=on_g'>LED GREEN ON</a> </div>"
  "<div style='background-color:DARKGREEN'> <a href='/?cmd=off_g'>LED GREEN OFF</a> </div>"
  "<br/>"
  "<div style='background-color:RED'> <a href='/?cmd=on_r'>LED RED ON</a> </div>"
  "<div style='background-color:DARKRED'> <a href='/?cmd=off_r'>LED RED OFF</a> </div>"
  "</body></html>";

void notFound(AsyncWebServerRequest *request)
{
  request->send(404, "text/plain", "Not found");
}

void server_get_home(AsyncWebServerRequest *request)
{
  if (request->hasArg("cmd"))
  {
    String command = request->arg("cmd");

    if (command.equals("on_r"))
      digitalWrite(LED_R, HIGH);
    else if (command.equals("off_r"))
      digitalWrite(LED_R, LOW);
    else if (command.equals("on_g"))
      digitalWrite(LED_G, HIGH);
    else if (command.equals("off_g"))
      digitalWrite(LED_G, LOW);
  }

  request->send(200, "text/html", HOME_HTML);
}

void setup_server()
{
  WiFi.mode(WIFI_STA);
  WiFi.begin(ssid, password);
  if (WiFi.waitForConnectResult() != WL_CONNECTED)
  {
    Serial.printf("WiFi Failed!\n");
    return;
  }

  Serial.print("IP Address: ");
  Serial.println(WiFi.localIP());

  server.on("/", HTTP_GET, server_get_home);
  server.onNotFound(notFound);

  server.begin();
}

void setup()
{
  Serial.begin(115200);

  // setup LED's
  for (int i = 0; i < 5; i++)
    pinMode(leds[i], OUTPUT);

  setup_server();
}

void loop()
{
  Serial.print("IP Address: ");
  Serial.println(WiFi.localIP());
  delay(3000);
}
The code above returns the following HTML page as the home page, the user clicks on each link and the browser sends the URL with cmd=xxxx argument to the ESP32 and the process_cmd method turns on/off the specified (RED or GREEN) LED.
<html>
    <body style="width: 250px;">
        <div style="background-color: GREEN;"><a href="/?cmd=on_g">LED GREEN ON</a></div>
        <div style="background-color: DARKGREEN;"><a href="/?cmd=off_g">LED GREEN OFF</a></div>
        <div style="background-color: RED;"><a href="/?cmd=on_r">LED RED ON</a></div>
        <div style="background-color: DARKRED;"><a href="/?cmd=off_r">LED RED OFF</a></div>
    </body>
</html>
The server_get_home process each request on root url of the server.
void server_get_home(AsyncWebServerRequest *request)
{
  if (request->hasArg("cmd"))
  {
    String command = request->arg("cmd");

    if (command.equals("on_r"))
      digitalWrite(LED_R, HIGH);
    else if (command.equals("off_r"))
      digitalWrite(LED_R, LOW);
    else if (command.equals("on_g"))
      digitalWrite(LED_G, HIGH);
    else if (command.equals("off_g"))
      digitalWrite(LED_G, LOW);
  }

  request->send(200, "text/html", HOME_HTML);
}
After programming the above source code and rebooting you can see your ESP IP address via serial monitor as below, enter the IP address to your browser. Note that your browsing device should connect to the same ESP32 wifi network.
ets Jun  8 2016 00:22:57

rst:0x1 (POWERON_RESET),boot:0x13 (SPI_FAST_FLASH_BOOT)
flash read err, 1000
Falling back to built-in command interpreter.
OK
>ets Jun  8 2016 00:22:57

rst:0x10 (RTCWDT_RTC_RESET),boot:0x13 (SPI_FAST_FLASH_BOOT)
configsip: 0, SPIWP:0xee
clk_drv:0x00,q_drv:0x00,d_drv:0x00,cs0_drv:0x00,hd_drv:0x00,wp_drv:0x00
mode:DIO, clock div:2
load:0x3fff0030,len:1184
load:0x40078000,len:12784
load:0x40080400,len:3032
entry 0x400805e4
IP Address: 192.168.1.51
IP Address: 192.168.1.51
IP Address: 192.168.1.51
IP Address: 192.168.1.51
IP Address: 192.168.1.51
IP Address: 192.168.1.51
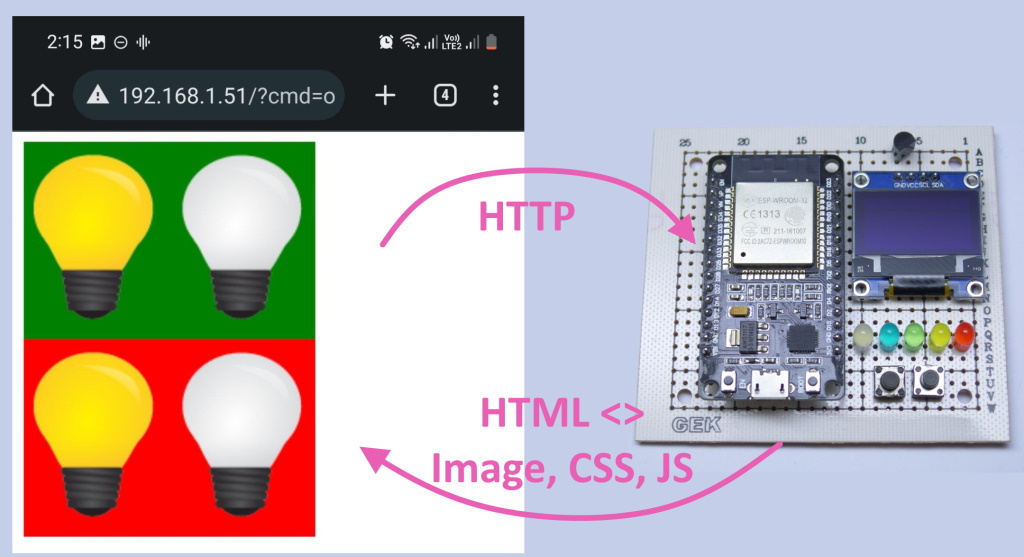
Advanced Web Server On ESP32
As you saw above, the HTML code is a part of the main CPP code and you can't use large js libraries such as jquery, or embed an image in your HTML code.
OTAdrive brings an OTA resources service which allows the developer to save the static HTML files into the ESP file system. These files can change via the OTA resources mechanism remotely without any change on firmware or reboot of the module.
 {.mud-image .fluid .object-fill .object-center}
HTML Server With OTA Resources
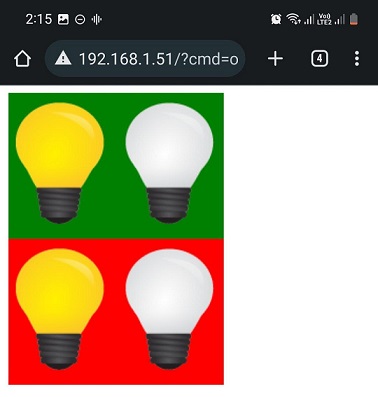
As we can serve multiple and large files now, I've changed the HTML code to this. In this code, we are using two image icons as on / off buttons. We should inject these images to ESP32 using OTAdrive OTA resources service. You should upload files to your product panel and call OTADRIVE.syncResources() to sync all local files with uploaded files to the OTAdrive. For more information about resources please check here.
<html>

<head>
    <style>
        .btn {
            height: fit-content;
            width: fit-content;
        }
    </style>
</head>

<body>
    <div class="btn" style="background-color: green;">
        <a href="?cmd=on_g"><img src="ON.png"></a>
        <a href="?cmd=off_g"><img src="OFF.png"></a>
    </div>

    <div class="btn" style="background-color: red;">
        <a href="?cmd=on_r"><img src="ON.png"></a>
        <a href="?cmd=off_r"><img src="OFF.png"></a>
    </div>
</body>

</html>
To upload html and images to OTAdrive please follow the video or check here.

Using Resources
If you didn't use the OTAdrive Arduino library before, please check here.
You should add the following change to the above program to make it use saved files on file system memory instead of HTML strings.
In setup() method you should initialize SPIFFS and set the firmware information with setInfo(). Note that you should call server.serveStatic(...) method after set page handlers with server.on method.
...
#include <otadrive_esp.h>

void setup()
{
  ...
  SPIFFS.begin(true);
  OTADRIVE.setInfo("YOUR_PRODUCT_APIKEY", "YOUR_FIRMWARE_VERSION");
}

void server_get_home(AsyncWebServerRequest *request)
{
  process_cmd(request);
  request->send(SPIFFS, "/static_html/index.html", "text/html");
}

void setup_server()
{
  server.addHandler(new SPIFFSEditor(SPIFFS));

  server.on("/", HTTP_GET, server_get_home);
  server.serveStatic("/", SPIFFS, "/static_html/").setDefaultFile("index.html");
  server.onNotFound(notFound);

  server.begin();
}

void loop()
{
  if (OTADRIVE.timeTick(60))
    OTADRIVE.syncResources();

  Serial.print("IP Address: ");
  Serial.println(WiFi.localIP());
  delay(3000);
}
Final Code
After all these change our code become this. You can get this project files on our git repository.
#include <otadrive_esp.h>

#include <Arduino.h>
#ifdef ESP32
#include <WiFi.h>
#include <AsyncTCP.h>
#elif defined(ESP8266)
#include <ESP8266WiFi.h>
#include <ESPAsyncTCP.h>
#endif
#include <ESPAsyncWebServer.h>
#include <SPIFFSEditor.h>

#define LED_W 4
#define LED_B 16
#define LED_G 17
#define LED_Y 18
#define LED_R 19
#define BTN1 13
#define BTN2 12
const int leds[] = {LED_W, LED_B, LED_G, LED_Y, LED_R};

AsyncWebServer server(80);

const char *ssid = "OTAdrive";
const char *password = "@tadr!ve";

void notFound(AsyncWebServerRequest *request)
{
  request->send(404, "text/plain", "Not found");
}

void server_get_home(AsyncWebServerRequest *request)
{
  Serial.printf("%s\n", request->url().c_str());
  if (request->hasArg("cmd"))
  {
    String command = request->arg("cmd");

    if (command.equals("on_r"))
      digitalWrite(LED_R, HIGH);
    else if (command.equals("off_r"))
      digitalWrite(LED_R, LOW);
    else if (command.equals("on_g"))
      digitalWrite(LED_G, HIGH);
    else if (command.equals("off_g"))
      digitalWrite(LED_G, LOW);
  }

  request->send(SPIFFS, "/static_html/index.html", "text/html");
}

void setup_server()
{
  server.addHandler(new SPIFFSEditor(SPIFFS));
  server.on("/", HTTP_GET, server_get_home);
  server.serveStatic("/", SPIFFS, "/static_html/").setDefaultFile("index.html");
  server.onNotFound(notFound);

  server.begin();
}

void setup()
{
  Serial.begin(115200);

  // setup LED's
  for (int i = 0; i < 5; i++)
    pinMode(leds[i], OUTPUT);

  // Setup WiFi
  WiFi.mode(WIFI_STA);
  WiFi.begin(ssid, password);
  if (WiFi.waitForConnectResult() != WL_CONNECTED)
  {
    Serial.printf("WiFi Failed!\n");
    return;
  }

  Serial.print("IP Address: ");
  Serial.println(WiFi.localIP());

  setup_server();

  SPIFFS.begin(true);
  OTADRIVE.setInfo("YOUR_PRODUCT_APIKEY", "YOUR_FIRMWARE_VERSION");
}

void loop()
{
  if (OTADRIVE.timeTick(60))
    OTADRIVE.syncResources();

  Serial.print("IP Address: ");
  Serial.println(WiFi.localIP());
  delay(3000);
}